Custom made versatile autonomous MiTM WiFi box v1.0
Recently I have published a photo of this box on twitter and couple of people asked if I can share more details on how I have build it. I did plan to do it, but never got to actually spend some time writing about it. So this would be long overdue blog post on building and assembling of MiTM WiFi box that I was using during some penetration testing scenario’s in the past.

Usual disclaimer: Do not use such device(s) without written consent of your target(s). In some countries this is illegal and you could bare serious legal consequences if you use it without permission.
Tool requirements #
To build this box, you will most likely need these tools:
- A drill
- 5 or 6mm wood/metal drill bit
- Open end spanner - size 8
- Pliers
- Scalpel
- Zip ties
The BOX selection #
While searching for box that could be used for this project, there where some requirements that I wanted to acquire, as this was to be used more than once, and it was not throw-away type of device.
Box requirements:
- Needs to be black :)
- Need to be versatile
- Size needs to be aprox. ~230 x ~150 x ~100mm
- Must be watertight (can withstand rain/snow for prolonged time)
- Can withstand direct sunlight and temperatures between -10 and +35C
- Must be reasonable price (no Peli price range)
- Bonus: It has foam included, can be locked with padlock
Word of advice: In humble beginning of your R&D phase you can also make test this from regular plastic food container and use some duct tape and/or hot glue. Keep in mind plastic food containers have very thin walls and you will most likely use different fixing options and connector lenghts. For example (picture taken from another not related project) as an example:

Anyway, my choice after searching options and alternatives narrowed down to B&W type 1000 Outdoor Case that has all the features I needed, and it fit in requirements above mentioned (and it’s ~40EUR), size of the box is 250 x 180 x 95mm.
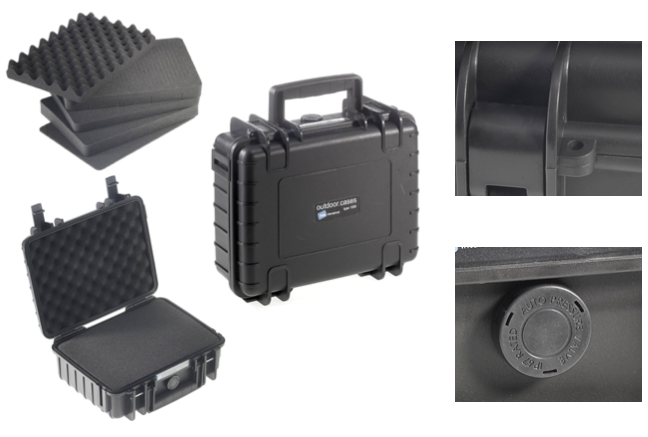
I have tested this box in many situations, like on rooftop, on dusty and/or wet conditions (rain, snow) and never had any issues or problems with box or devices inside. So I would highly recommend it. I would not recommend leaving box on direct sunlight, not because of the box itself, but because of battery inside that can overheat and burst into flames.
Antenna dilema #
It was either I keep antennas inside the case, and then limit options, range, signal quality, but get covert option or put antennas outside. Since this box was meant to be hidden anyway, the decision was to put antennas outside. This created another problem. I needed custom cables with extended connectors to be able to make this. Reason was that the case plastic was 4,5 mm thick. Your mileage may vary.
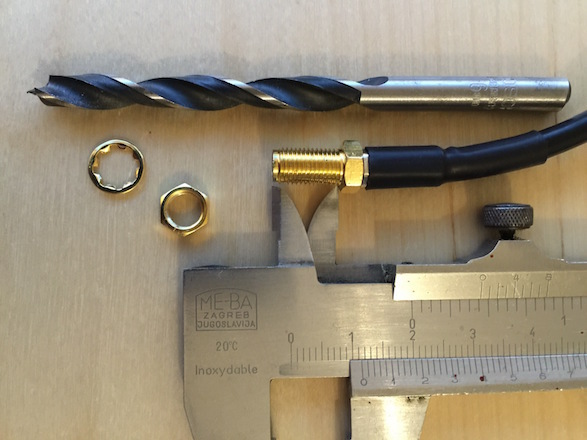
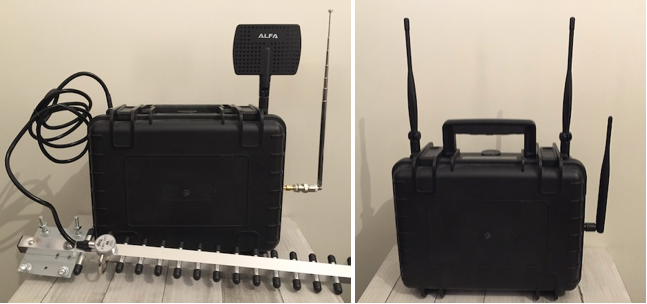
Using 5mm (6mm is also fine) wood drill I have made 3 holes for 3 external antennas. With 5mm drill you will have to twist harder the SMA connector thru but this will create much better (stiffer) connection with case, so it will not be loose as you thread it thru case. 3 holes give us 3 antenna positions, two on top and one on the side. At that time, idea was to mainly use Hak5 Pineapple Mark V and have option to add additional device(s) if there was need. This happens to be advantage right from the start. As I started using this box, the need to have additional connector to get out antenna for additional WiFi or SDR or GSM become real, and this happens to be good decision.
And btw, it was not easy getting Pineapple at that time for foreigners, Shannon from Hak5 was very suspicious about me visiting Hak5 HQ’s (they didn’t accept cache payment or visits to the “shop”), or delivering it to Hotel in San Jose where I was staying at that time. But that’s a story for another time, the point is I got the device thanks to good friends even tho Hak5 at that time refused selling it (Hi Shannon :).
So at the beginning (v1.0) this was the setup:

Cables and connectors #
SMA (SubMiniature version A) connectors are semi-precision coaxial RF connectors developed in the 1960s as a minimal connector interface for coaxial cable with a screw type coupling mechanism. The connector has a 50 Ω impedance. SMA is designed for use from DC to 18 GHz, but is most commonly encountered with WiFi antenna systems and USB Software Defined Radio dongles (Wikipedia).

I would recommend to double triple check what connectors you have on each side (device and antenna)! Keep in mind in case you need to use any adapters or additional cables you will loose signal quality. Cables and connectors need to be good quality and as short as possible.
Due to case walls being 4.5mm thick I needed to use extended connectors so when you fix them to the case, they have enough threads to actually fix antenna and make good connection.
These cables you can maybe find online or you can order them to be made with exact length and with SMA connectors that you need. In this particular setup I was using SI-195 195 type, .195", foam, 50 Ohm, Low loss, braided coaxial cable.
Cabling #
Depending on your setup, and devices used, you will need couple of USB cable(s), power cable(s), ethernet cable, and I would recommend these L shaped USB adapters. I found out they can save you a lot of space when arranging devices inside case due to usual size of USB cables/connectors. They are not mandatory but it will help you pack more items inside case. At the time of creating v1.0 of case, I had only these long USB cables, later on I made some much shorter versions to conserve space as much as I could.

Battery #
This case has enough space to be used by devices and battery power banks. In my v1.0 setup, I have selected Tenergy model 51097 with capacity of 16000 mAh / 59.2Wh with selected DC output of 12V/16V/19V (60W max) and additional USB 5V (2.1A max) output. This model is using lithium-ion polymer battery (LIPO). In case you need to use this device in high temperature areas, either change to other type of battery, or control/monitor temperature inside case. In case that battery overcharge, over-discharge, over-temperature, short circuit, crush and nail penetration could all result in a catastrophic failure, including the pouch rupturing, the electrolyte leaking, and fire. This particular model has some protections against these issues, but I didn’t bother looking into specs as my scenarios didn’t include extreme temperature ranges. Btw, monitoring temperature with RPi is easy. Keep this information in head, as I am sure you do not want to put your target customer on fire.
Size of the power bank battery was also what I was looking for, with dimensions 185mm(L) x 124mm(W) x 14mm(H). This was ideal since Pineapple usage is between 5-12V up to 2A and Beaglebone or RPi where using 5V over USB. And the best part due to battery being slim, you could use 2 of these inside case. Depending on number of devices, number of battery power banks, capacity of power banks, and usage of them you are looking into 16 to 48+ hours of independent working time. This is not the best setup, but it worked just fine for me.

Devices used #
What devices you could use really depends on your imagination, usage scenario, skill or simply what you have at that time. If you do not have Hak5 Pineapple you could simply build it yourself, and/or you can mix different types of devices to achieve your goal(s). Here are some devices I was using with v1.0 version of the box (in different combinations).
- RPi with TFT display & FONA GSM module
- NooElec DVB-T SDR (R820T2)
- BeagleBone Black or RPi2
- Ubertooth One
- Hak5 Pineapple Mark V (Currently EOL)
- ALFA AWUS036NHA (AR9271) and others
- TP-Link M5350

Antenna(s) used #
This depends on what you want to do, but I would not recommend to use anything longer than 300mm in case of concealment. In case of stationary with directional antenna usage, it does not matter of course. The combinations are only limited by your imagination.

Setup & configuration of devices #
How to actually configure used devices is out of the scope of this blog entry. There are plenty very good howto’s on the net, that can help you configure your perfect setup.
Conclusion #
Building such box was fun, and using it even more. I hope this blog entry helps you build your own. If you like to share your details, let me know.